User Guide
-
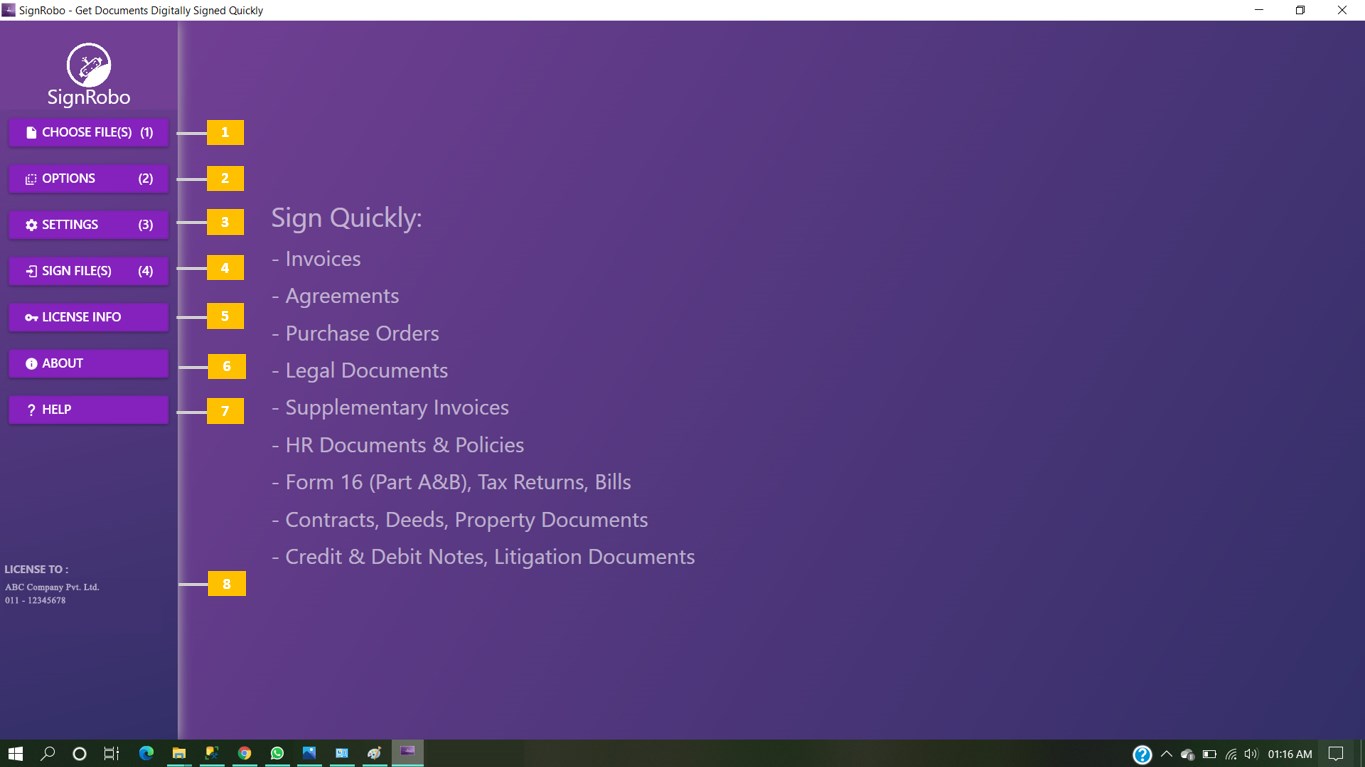
Let us explain you home window.
This is home window of SignRobo, let's see what it has.
- Choose a file, multiple files at a time or a complete folder from here that you want to get digitally signed.
- Insert meta tags or set properties for the file that is going be to digitally signed. These are optional settings.
- View or set DSC position on the file, define page numbers, insert DSC validation image backgound and set custome attributes, settings are all about that.
- Finally sign the file or files. Check your license info e.g. license is given to, which version of SignRobo you are using, whether it is a trial version or licensed.
- Know about SignRobo, what you can do using SignRobo.
- Step by step operational guidence is given, frequently asked questions will resolved your general queries and video help give you visual help.
- Here you will see quick license info.
-
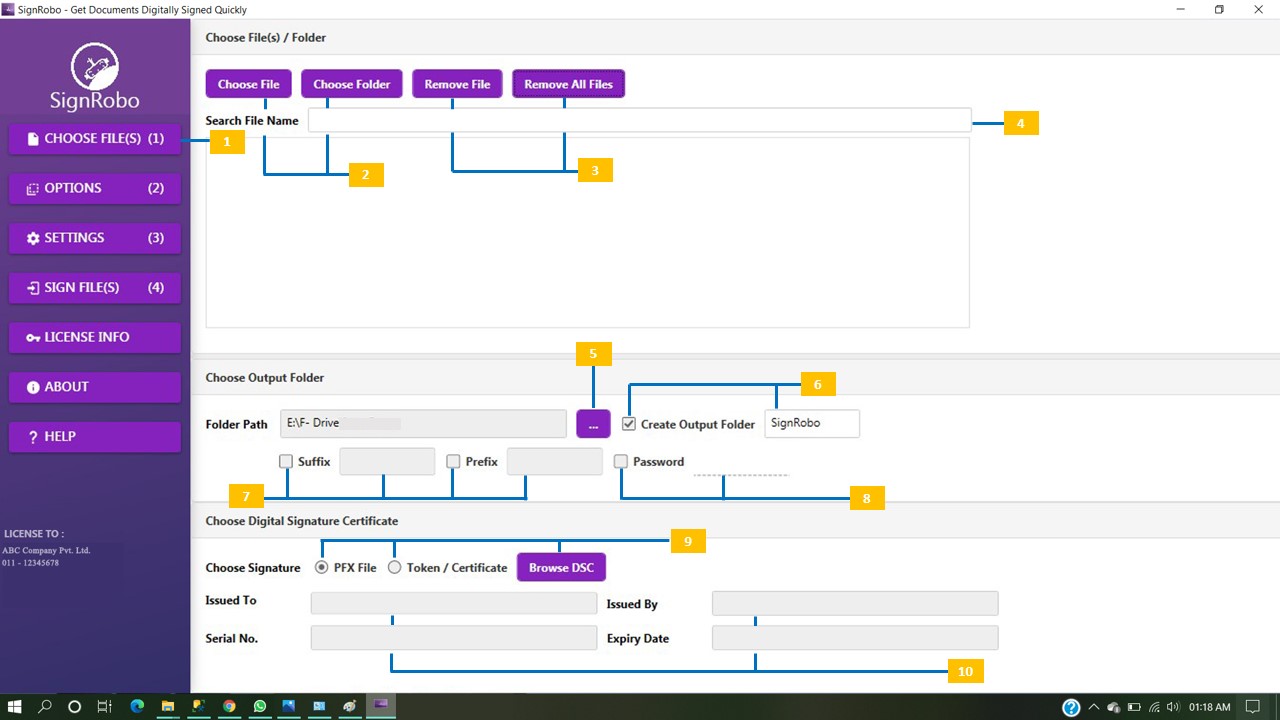
How "Choose File(s)" Button Works?
Let's see how to add a file or multiple files for signing.
- Click on "Choose File(s)" button.
- Either click on "Choose File" button to choose a file or multiple files or click on "Choose Folder " to choose complete folder containing files.
- If you want to remove a file for any reason, select that file from the list and then click on "Remove File " button. That selected file will be removed from the list. If you want to remove all the listed files for any reason, simply click on "Remove All Files " button. You will see all the listed have been removed.
- Type a file name to search that within the list of files that you uploaded.
- Well, now choose output folder using "Folder Path " option, in which folder fille (s) will be saved after being digitally signed.
- If you want to create output folder from here only, tick "Create Output Folder " and enter the name of the folder as per your choice. File(s) will be stored in this folder after being digitally signed.
- If you want to give a different name of the file(s) after being digitally signed, use "Suffix" and "Prefix" option.
- If you want to protect the file(s) with a password after being digitally signed, tick "Password" option and then enter password. File(s) will be protected with this password after being digitally signed. When you open that file, you will have to enter that password.
- Now choose valid PFX file or insert token into USB port of your computer, and choose DSC using "Browse DSC " button and enter valid DSC password to use it.
- After choosing DSC, you will see details of DSC e.g. issued to, issued by, serial number and expiry date of the DSC.
-
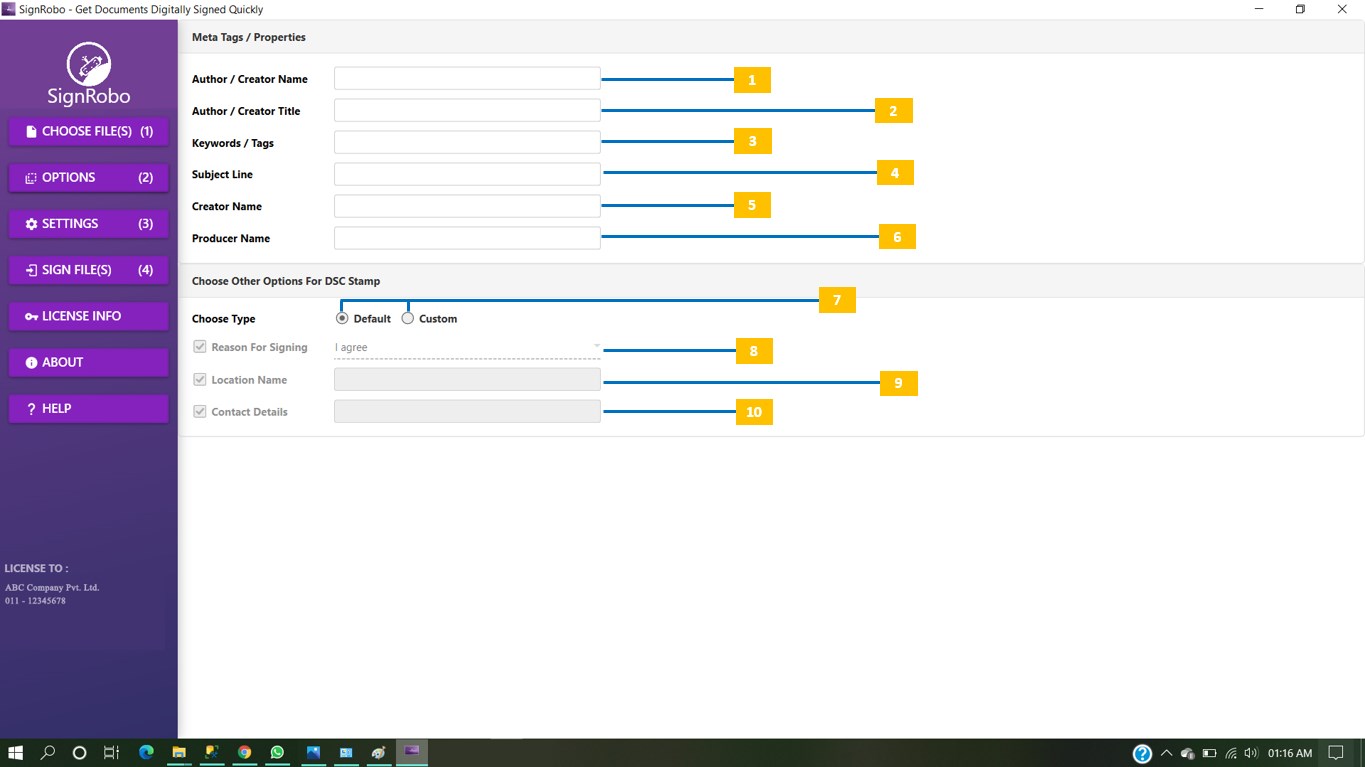
What All "Options" Button Has?
Now it is time to set properties or meta tags for the file(s) that will get digitally signed.
- Enter author/creator name, if you wish to set this as property of the file that will create after being digitally signed.
- Enter author/creator title, if you wish to set this as property of the file that will create after being digitally signed. Title could be that person's designation.
- Enter some keywords / tags, if you wish you set as file property. For example - document verified, verified by CEO, and reviewd by director etc.
- Enter subject, for example - Policy document for workers and Agreement document for ABC Co. etc.
- Enter document creator's name, if you wish to set it as file property.
- Enter the name of the person who produced this document.
- Choose "Default" if you do not want to set other custom options for file e.g. reason, location etc. else choose "Custom ".
- If you chosen "Custom" then please select "Reason For Signing ".
- And "Location Name ", e.g. if you have two offices in a state, Noida and Ghaziabad. So enter Noida as location name, if you are signing this document from Noida location office.
- Enter "Contact Details ", if you wish to set as a property of the file.
-
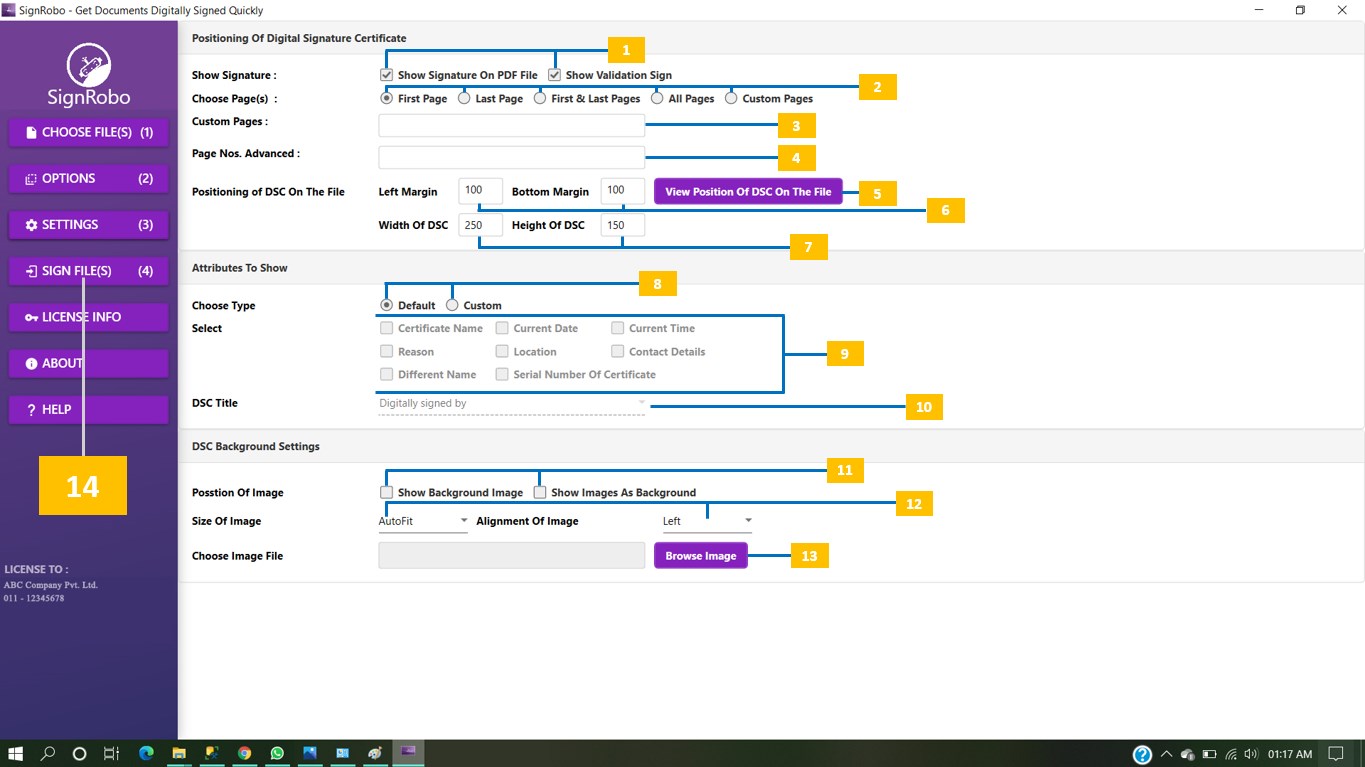
"Settings" Button - Positioning of DSC & Defining Page Numbers
-
Setting up DSC location on the file and defining page numbers to get digitally signed.
- Tick here on "Show Signature On PDF File " if you want to show DSC sign on the page, tick here on "Show Validation Sign " if you want to show right green tick, which is validation sign, on the page else untick it.
- Choose pages from here on which you want get signed.
- Choose "First Page ", if you want to sign on first page of the file(s).
- Choose "Last Page ", if you want to sign on last page of the file(s).
- Choose "All Page ", if you want to sign on all the page of file(s).
- Choose "Custom Page" to define custom page numbers for example if you a uploaded 50 pager file and you want to sign on page number 3 to page number 9 then page number 21 to page number 33 and page number 41 to page number 49. So you will have to choose "Custom Page" first and then enter values in "Custom Page(s) " text box, 3-9, 21-33, 41-49.
- Choose "Page Nos. Advanced" to define custom page numbers for example if you a uploaded 50 pager file and you want to sign on page number 3, 9, 17, 21, 27, 33, 45, 50. So you will have to enter values in "Page Nos. Advanced" text box as 3, 9, 17, 21, 27, 33, 45, 50.
- Click on "View Position Of DSC On The File " button to set DSC position on the page. Wait until SignRobo prepares a perview for you. After clicking on this button, SignRobo opens a preview window where you can set position of DSC by moving green box. After setting up position of DSC click on "OK" button.
- Enter values in pixels in "Left Margin" and "Bottom Margin" text boxes to set position of DSC on the page manually.
- Set width and height of DSC (box) by entering values in pixels in "Width Of DSC" and "Height Of DSC " text boxes.
- What else you want to show in DSC block on the page choose "Default", if you want to show default values only, else choose "Custom " if you want to show custom values in block.
- For choosing custom values that you want to show, tick against the value type that you want to show. E.g. certificate name, current date and time, reason, location and contact details etc.
- Choose "DSC Title" from the drop-down, this will show in the block of DSC.
- If you want to show default background image then tick "Show Background Image" and if you want to show image as backgorund then tick "Show Images As Background".
- Set image size using drop-down and alignment of image using "Alignment Of Image" drop-down.
- Browse the image that you want to show in the block of DSC.
- CLICK ON "SIGN FILE(S)" BUTTON AND NOW FINALLY TIME TO SIT BACK AND RELAX, LET SignRobo DO IT'S FAVOURITE WORK FLAWLESSLY. SignRobo STARTED SIGNING DOCUMENTS. SignRobo WILL LET YOU KNOW ONCE TASK COMPLETED.
 Try SignRobo for Free